Jetpack compose layout
Android moves on next level of layout

In this article, we will discuss Jetpack compose layout.
Jetpack compose is a modern UI toolkit, It simplifies and accelerates UI development on Android.
that you don’t need to design your layout in separate class like XML,
Just keep in mind want you need to create and, then write this with your main code.
If you something familiar on flutter, then you look this “aww what a goodness, it’s an awesome”
be frankly, I am so excited after hearing that, android (native) also adapted this thing now
Now let’s start, what we needed for this to use,
source link for all of this detail is here, Android JetPack
just a quick look at this, what we will discuss in this article. all of these points in here.
- Which Android studio version we needed
- setup jetpack
- Design our pages with the widget (most important point)
- Add Jetpack Compose to an existing project
- How to navigate between pages.
so,
let us start with our first point
1. Which Android studio version we needed
First of all, it’s needed Android Canary(4.2)
For the best experience developing with Jetpack Compose, you should download the latest canary version of Android Studio Preview.
2. setup jetpack
Create a new app with support for Jetpack Compose
If you want to start a new project that includes support for Jetpack Compose by default, Android Studio includes new project templates to help you get started. To create a new project that includes Jetpack Compose, proceed as follows:
- If you’re in the Welcome to Android Studio window, click Start a new Android Studio project. If you already have an Android Studio project open, select File > New > New Project from the menu bar.
- In the Select, a Project Template window, select Empty Compose Activity and click Next.
- In the Configure your project window, do the following:
- Set the Name, Package Name, and Save location as you normally would.
- Note that, in the Language dropdown menu, Kotlin is the only available option because Jetpack Compose works only with classes written in Kotlin.
- In the Minimum API level dropdown menu, select API level 21 or higher.
- Click Finish.
- Verify that the project’s
build.gradlethe file is configured correctly, as described in Configure Gradle.
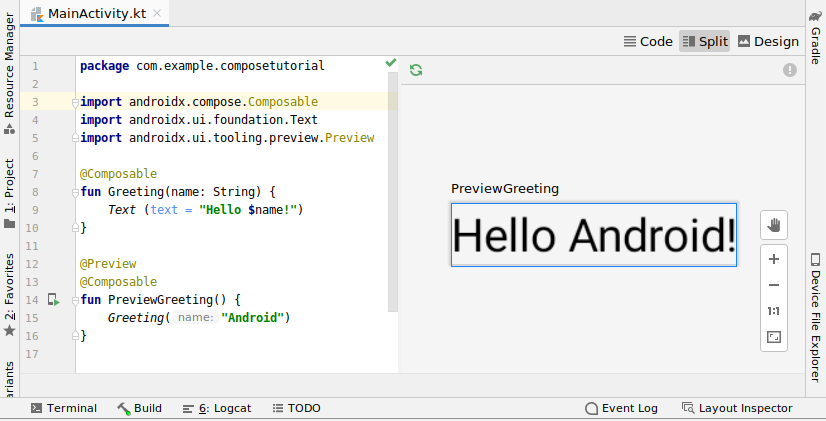
3. Design our pages with the widget
Now it’s time to coding,
The first thing is how we design this,
means how we will start this
So,
We have familiar with Linear layouts, relatively, coordinate, constraints, etc.
In their design, they provide in place of composable.
the composable function is used for the draw UI design.
All widgets need to placed inside the composable function.
Like as we need vertical direction items like vertically placed items,
We use the here Column.

And
Horizontally items placed, we use Row.

And if we need the material design we placed all widgets inside MaterialTheme.
The first and most important thing is we start this by place all this inside set content.
There is a various widget available for design also as well as there is a widget available for small things like creating space etc.
So let’s imagine there are all things available that you needed in smart, pixels perfect and interactive UI.
Now I think it’s sufficient to describe, how we will design a page using this widget.
(if you want more widget details, please ask in the comments)
(I just try to describe all things in a short way)
4. Add Jetpack Compose to an existing project
Now move on to how we deal with our old projects(because everyone use XML at this time)
So
Interoperability very important to adopt an old codebase, because no one wants that, we will totally swipe out our older code for new technology.
Also android knows these things, that’s why they didn’t close even java code, in this time of everyone uses kotlin.
So,
The first is to set up this with your project,
Add Jetpack Compose to an existing project
If you want to use Jetpack Compose in an existing project, you’ll need to configure your project with the required settings and dependencies.
Configure Kotlin
Make sure you’re using Kotlin 1.4.30 or newer in your project:
plugins {
  id 'org.jetbrains.kotlin.android' version '1.4.30'
}
Configure Gradle
You need to set your app’s minimum API level to 21 or higher and enable Jetpack Compose in your app’s build.gradle file, as shown below. Also, set the version for the Kotlin compiler plugin.
android {
    defaultConfig {
        ...
        minSdkVersion 21
    }    buildFeatures {
        // Enables Jetpack Compose for this module
        compose true
    }
    ...    // Set both the Java and Kotlin compilers to target Java 8.    compileOptions {
        sourceCompatibility JavaVersion.VERSION_1_8
        targetCompatibility JavaVersion.VERSION_1_8
    }    kotlinOptions {
        jvmTarget = "1.8"
    }    composeOptions {
        kotlinCompilerExtensionVersion '1.0.0-beta01'
    }
}
Add Jetpack Compose toolkit dependencies
Include Jetpack Compose toolkit dependencies in your app’s build.gradle file, as shown below:
dependencies {
    implementation 'androidx.compose.ui:ui:1.0.0-beta01'
    // Tooling support (Previews, etc.)
    implementation 'androidx.compose.ui:ui-tooling:1.0.0-beta01'
    // Foundation (Border, Background, Box, Image, Scroll, shapes, animations, etc.)
    implementation 'androidx.compose.foundation:foundation:1.0.0-beta01'
    // Material Design
    implementation 'androidx.compose.material:material:1.0.0-beta01'
    // Material design icons
    implementation 'androidx.compose.material:material-icons-core:1.0.0-beta01'
    implementation 'androidx.compose.material:material-icons-extended:1.0.0-beta01'
    // Integration with activities
    implementation 'androidx.activity:activity-compose:1.3.0-alpha03'
    // Integration with ViewModels
    implementation 'androidx.lifecycle:lifecycle-viewmodel-compose:1.0.0-alpha02'
    // Integration with observables
    implementation 'androidx.compose.runtime:runtime-livedata:1.0.0-beta01'
    implementation 'androidx.compose.runtime:runtime-rxjava2:1.0.0-beta01'    // UI Tests
    androidTestImplementation 'androidx.compose.ui:ui-test-junit4:1.0.0-beta01'
}
You can use this with your older projects pies by pies in fragments and activities.
like this,
<?xml version="1.0" encoding="utf-8"?>
<LinearLayout
    xmlns:android="http://schemas.android.com/apk/res/android"
    android:orientation="vertical"
    android:layout_width="match_parent"
    android:layout_height="match_parent">

    <TextView
        android:id="@+id/hello_world"
        android:layout_width="match_parent"
        android:layout_height="wrap_content"
        android:text="Hello Android!" />

    <androidx.compose.ui.platform.ComposeView
        android:id="@+id/compose_view"
        android:layout_width="match_parent"
        android:layout_height="match_parent" />

</LinearLayout>
here is a full example, jetpack interoperability
5 . How to navigate between pages.
Now the next point is how to navigate between pages.
because
we design the pages, also we know how to configure with our old project.
so,
let's start the navigation component,
go to this link,
https://developer.android.com/guide/navigation/navigation-getting-started
after this copy these versions and dependencies

include this in your build.gradle
Now, let's start
first is you need to create a graph(it means to need to set action between multiple screens)
so, first right click on res.


After creating a graph file,
Let’s start to create action between there

after created all this stuff,
just set on click like this
override fun onClick(view: View) {
    val action =
        SpecifyAmountFragmentDirections
            .actionSpecifyAmountFragmentToConfirmationFragment()
    view.findNavController().navigate(action)
}
for more detail, see the full description
I know its totally new things we all adaptable for XML design, but believe me after you will use this,you said how fantastic this is,
Thanks for reading, I added only those things that I think, it's required to define what is Jetpack compose in android
If you got something wrong? Mention it in the comments. I would love to improve. your support means a lot to me! If you enjoy the content, I’d be grateful if you could consider subscribing to my YouTube channel as well.
I am Shirsh Shukla, a creative Developer, and a Technology lover. You can find me on LinkedIn or maybe follow me on Twitter or just walk over my portfolio for more details. And of course, you can follow me on GitHub as well.
Have a nice day!🙂